
Showing posts with label sketch. Show all posts
Showing posts with label sketch. Show all posts
5/5/12
Loomis Heads 11-20
Here's my second batch. I'm hoping I can stick with this when life gets in the way.
5/4/12
Loomis Heads 1-10
I've come to realize that I haven't been doing nearly enough drawing. Circumstances can be blamed. But the truth doesn't change. I won't get better without practice.
 It's been said that it takes ten thousand attempts at something to become an expert. But, that is too much to bite off at one time. So, I'll start small. I'm going to draw 100 Loomis style heads. Here is my first batch.
4/16/12
Leaning Woman; Sorta like Tracing
Here is some work I did yesterday. I started with the reference photo open in photoshop. Then I drew in the skeleton on a layer above the reference photo. Like so:

Then I made the background image invisible but left the skeleton. I then fleshed out the form around the skeleton. I would periodically bring the background image up to see if I was accurate. This helped to show me where I was having issues. I had very few issues with the upper body and was surprised at how close I was. The only trouble area was the left breast, which for some reason confounded me. But, the legs and feet were where most of my issues occurred. I had to redraw them several times to get them right.
Here's the resulting work:
 BTW, I don't know to whom that original drawing belongs. If I did I would give credit. If it's yours speak up.
Then I made the background image invisible but left the skeleton. I then fleshed out the form around the skeleton. I would periodically bring the background image up to see if I was accurate. This helped to show me where I was having issues. I had very few issues with the upper body and was surprised at how close I was. The only trouble area was the left breast, which for some reason confounded me. But, the legs and feet were where most of my issues occurred. I had to redraw them several times to get them right.
Here's the resulting work:
Window Sketch and Kids Doodles
Just fooling around for a few minutes while the little one naps.
The kids always want to play when they see me take out the drawing tablet. So, I let the 2 and 4 year olds fiddle with it for a while as well. Here are their works:
Isaac the 4 year old. He calls this one "Mirage" after the Transformer of the same name.

Isla the 2 year old. She calls this one "Dotty" though I have no idea why.

The kids always want to play when they see me take out the drawing tablet. So, I let the 2 and 4 year olds fiddle with it for a while as well. Here are their works:
Isaac the 4 year old. He calls this one "Mirage" after the Transformer of the same name.
Isla the 2 year old. She calls this one "Dotty" though I have no idea why.
4/2/12
Wacom Intuos Power Session!
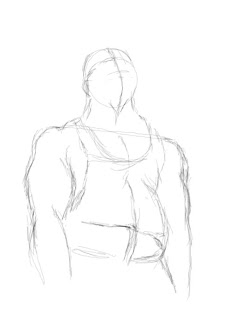
Here is my second attempt at drawing on the Wacom Intuos4. This is a photo of a friend of mine; powerlifter Ben Brand. He's a strong dude. There's like 700lb.s on that bar...I'm not exaggerating.
Here is the photo reference:

Here is the first sketch. You can see that the upper body is too narrow and leaning forward.

Here is the second attempt. Closer. But not quite right.
All of this represents about 45 minutes of work....most of which was figuring out the software. Actual drawing time was probably only about 15 minutes. I'm pleased at the progress. But, I have a way to go. Adapting to the Wacom is more difficult than I anticipated.
Here is the photo reference:

Here is the first sketch. You can see that the upper body is too narrow and leaning forward.
Here is the second attempt. Closer. But not quite right.
All of this represents about 45 minutes of work....most of which was figuring out the software. Actual drawing time was probably only about 15 minutes. I'm pleased at the progress. But, I have a way to go. Adapting to the Wacom is more difficult than I anticipated.
2/14/12
Manga First Attempt
Here is my first attempt at doing anything in a manga style. When I was younger I had "no interest" in doing anything in a cartoony style. And by "no interest" I mean that I had no confidence. It surprising how much you can hide in a more naturalistic style. I had no confidence in my lines. So, I'm now trying this for the first time with a healthy respect for this style.


5/7/11
Orc Sketch
Decided to work on something other than eyes for a change. Just did some sketches of an orc's face. Then decided to try to transfer the pencil drawing to a Bristol Board by retracing the image with a very heavy hand over top of the board. It didn't work.
Here's what I did tonight:


Here's what I did tonight:


1/23/11
First Attempt at Sketching Heads - Loomis Style
I'm back after a short break. We took the kids to Disney. And, as I'm sure you all know, when you take a couple of days off the days surrounding the vacation are filled with twice as much work as normal. Tonight was the first night that I had an hour to sit down and do anything other than work, unpack, etc.
So, I downloaded a book by Andrew Loomis. I'm reading a bit of it. I decided to practice some of his ideas of creating heads. The first attempts are dreadful. The last couple are almost passable as human.

 At least it's progress.....
So, I downloaded a book by Andrew Loomis. I'm reading a bit of it. I decided to practice some of his ideas of creating heads. The first attempts are dreadful. The last couple are almost passable as human.


1/5/11
Ellipses - My Mortal Enemy
The shape of an ellipse is my achilles heel. I never manage to get the shape right. But, It's a critical part of drawing and I know that I need to practice it. It's for this reason that I'm doing the classroom exercises from Wet Canvas; particularly the ellipses.
Here's what I did tonight. This is from a single 18"x24" piece of newspaper that I used tonight. I scanned it in quarters. Because it's essentially just doodles breaking it up doesn't cause any real issues.
I'm aware that this isn't especially interesting reading. But, I need to catalog these efforts for a couple of reasons. First, it keeps me accountable. Second, it helps me to see how I'm progressing and allows me to see later what helped me the most.


12/25/10
Glass Tears - First Sketch
This is a drawing that I made from a photo that I found on Wet Canvas in the "Classroom" section. This sketch took about 40 minutes. I intend to give it another shot as I know that I can improve upon this. The intent here was to try to draw quickly.....quick for me, anyway.
First, here is the drawing:

Second, here is the photo:

There are definitely issues to be worked out here. I cropped out too much of the photo. Additionally, the reference photo is clearly at more of an angle to the camera than my sketch portrays. Perspective eludes me! I'll have to give this another shot.
I will give myself one out here. I didn't want to draw the sketch while sitting at my computer desk so I attempted to print the photo. But, we were nearly out of ink. The version that I printed was far lighter, and far less sharp than this photo. This doesn't excuse the poor use of perspective, however.
I began this drawing at the top of the page by drawing a line for the eyebrow. Then I tried creating the shape of the eye starting at the left corner of the eye. Then I focused on the pupil. Next, I drew in the eye lashes saving the tears for last. I tend to shade as I go. So, I was drawing each area to nearly what you see now before moving on to the next. The reason that I'm writing all of this is so that I can look back on this someday and see what methods I've used and the results of those methods.
NOTE: Click Here for the Final "Much Improved" Version of this Drawing
First, here is the drawing:

Second, here is the photo:
There are definitely issues to be worked out here. I cropped out too much of the photo. Additionally, the reference photo is clearly at more of an angle to the camera than my sketch portrays. Perspective eludes me! I'll have to give this another shot.
I will give myself one out here. I didn't want to draw the sketch while sitting at my computer desk so I attempted to print the photo. But, we were nearly out of ink. The version that I printed was far lighter, and far less sharp than this photo. This doesn't excuse the poor use of perspective, however.
I began this drawing at the top of the page by drawing a line for the eyebrow. Then I tried creating the shape of the eye starting at the left corner of the eye. Then I focused on the pupil. Next, I drew in the eye lashes saving the tears for last. I tend to shade as I go. So, I was drawing each area to nearly what you see now before moving on to the next. The reason that I'm writing all of this is so that I can look back on this someday and see what methods I've used and the results of those methods.
NOTE: Click Here for the Final "Much Improved" Version of this Drawing
Subscribe to:
Posts (Atom)